Choosing the right light for a home is not only about brightness or wattage. The beam angle of a light plays an important role in deciding how the light spreads across a room, wall, floor, or particular object. A narrow beam can create a focused and dramatic effect, while a wider beam can illuminate a larger area more evenly. Understanding beam angles helps homeowners, interior designers, and builders choose lighting that is practical, comfortable, and visually appealing.
What Is a Beam Angle?
Beam angle is the angle at which light spreads from a lighting fixture. It determines whether the light is concentrated on a small area or distributed over a larger space. Beam angle is usually measured in degrees (°).
For example:
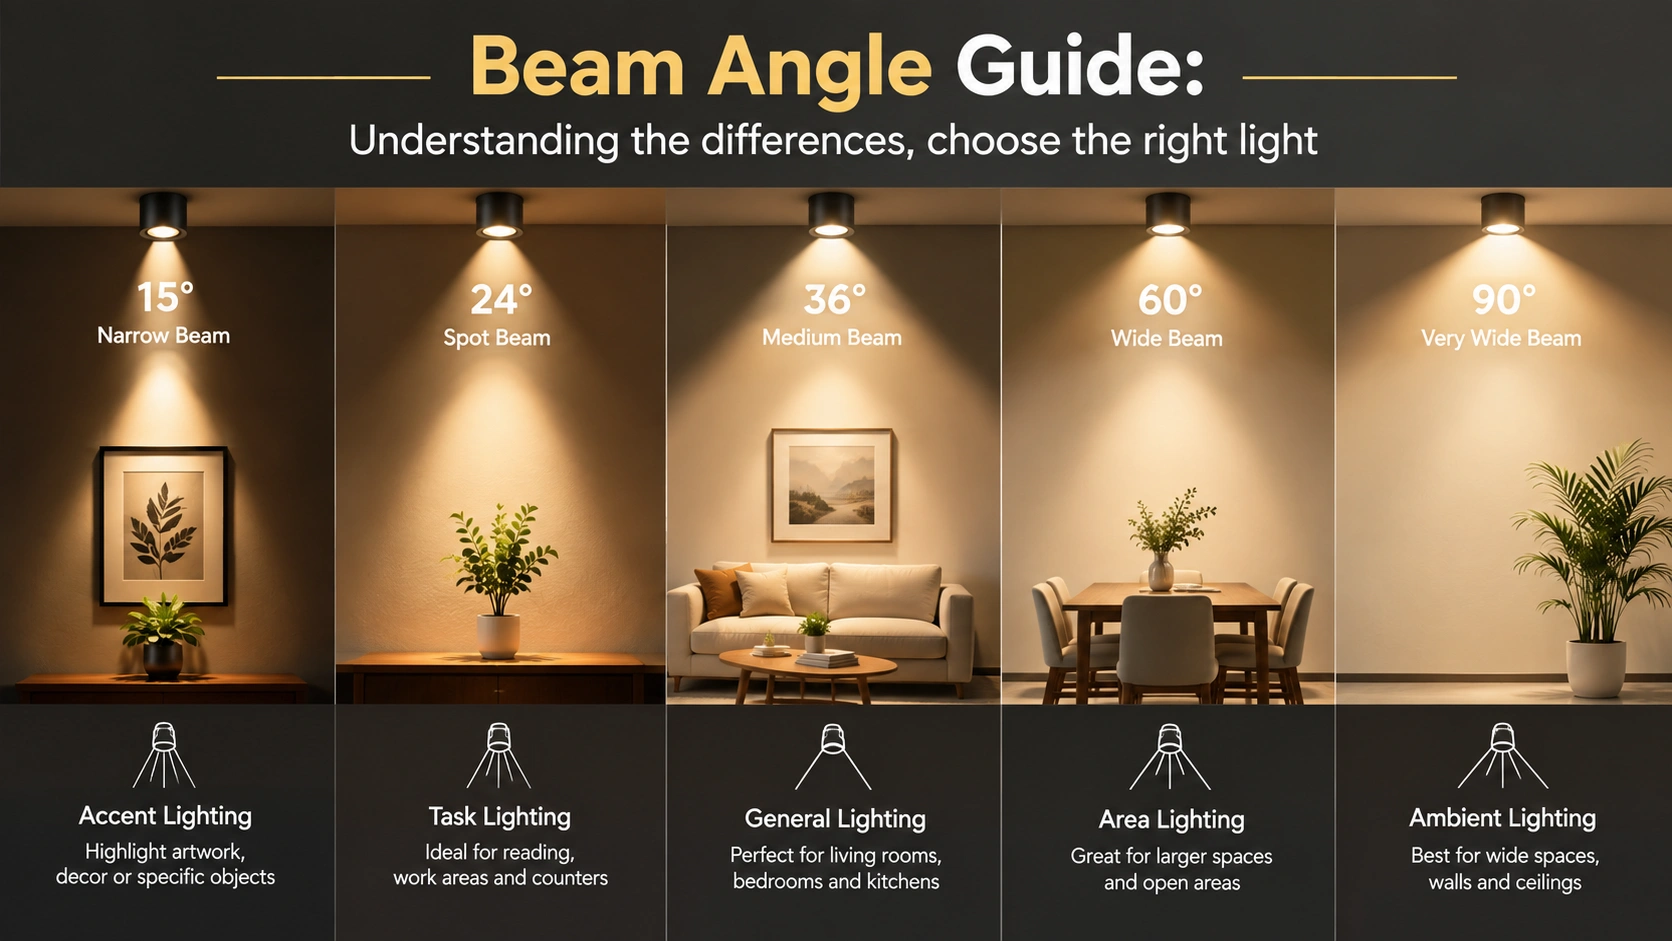
- 15° – Very narrow and highly focused
- 24° – Narrow and focused
- 36° – Medium and versatile
- 45° – Medium-wide
- 60° – Wide
- 90° and above – Very wide
The smaller the beam angle, the more concentrated the light appears. As the beam angle becomes wider, the illuminated area increases.
Why Is Beam Angle Important?
Beam angle affects the overall appearance and functionality of a lighting design.
1. Determines Light Coverage
A narrow beam covers a smaller area, while a wide beam covers a larger area.
2. Controls Visual Focus
Narrow beams can direct attention toward a painting, decorative wall, sculpture, or furniture.
3. Influences Room Uniformity
Wide beams can help distribute light across a larger area and reduce excessive concentration in one spot.
4. Affects Light Intensity
When similar light output is concentrated into a smaller area, the central portion can appear more intense.
5. Helps Plan Light Placement
Beam angle is useful when deciding the spacing between recessed lights, spotlights, and downlights.
Understanding Different Beam Angles
There is no single beam angle that is suitable for every situation. Each range serves a different lighting purpose.
- 15° Beam Angle – Highly Focused Lighting
A 15° beam creates a narrow cone of light.
Suitable for:
- Artwork
- Sculptures
- Decorative objects
- Showpieces
- Small displays
- Architectural details
- Feature elements
This type of lighting is particularly useful when the objective is to highlight one specific object or area.
Advantages
- Strong visual focus
- Creates a dramatic effect
- Highlights individual objects
- Suitable for accent lighting
Limitation
It covers a relatively small area, so it is generally not the first choice for illuminating an entire room.
- 24° Beam Angle – Accent Lighting
A 24° beam provides a focused but slightly wider spread than a 15° beam. It is useful when you want to highlight an object while allowing some surrounding light to blend into the space.
Suitable for:
- Wall décor
- Paintings
- Display units
- Decorative furniture
- Feature walls
- Retail displays
- Selected dining areas
A 24° beam can be a practical option for creating focused accent lighting without an extremely tight spotlight effect.
- 36° Beam Angle – Balanced Lighting
A 36° beam offers a useful balance between concentration and coverage. It is one of the more flexible options for residential interiors.
Suitable for:
- Living rooms
- Dining areas
- Kitchens
- Bedrooms
- Furniture zones
- Decorative walls
- Work areas
- Display areas
If you want a light that provides some focus while still covering a reasonable area, a medium beam angle can be considered.
- 45° Beam Angle – Medium-Wide Coverage
A 45° beam spreads light more broadly than a 36° beam. It can be useful when you want reasonably uniform illumination without moving all the way to a very wide beam.
Suitable for:
- Medium-sized rooms
- Living areas
- Bedrooms
- Corridors
- General residential lighting
- Office areas
The actual performance depends on the light output and optical design of the fixture.
- 60° Beam Angle – Wide Lighting
A 60° beam spreads light across a considerably larger area. It can be useful for general illumination where the objective is to avoid excessive concentration in individual spots.
Suitable for:
- Living rooms
- Bedrooms
- Kitchens
- Corridors
- Open spaces
- General ceiling lighting
- Larger areas
For a room requiring broad illumination, a wider beam can provide more useful coverage than multiple very narrow spotlights.
90° and Above – Very Wide Lighting
Beam angles of 90° or more provide extensive light distribution. These are useful when the goal is to illuminate a broad area rather than create a strong spotlight effect.
Suitable for:
- Large rooms
- Offices
- Commercial spaces
- Large ceiling areas
- Outdoor areas
- Broad wall illumination
- General ambient lighting
The suitability depends on the fixture, mounting height, and required illumination level.
Also Read: Types of Lights Used in Interiors
Beam Angle Comparison
| Beam Angle | Light Speed | Main Purpose |
| 10º-15º | Very Narrow | Strong accent lighting |
| 15º-24º | Narrow | Artwork and decorative features |
| 24º-36º | Mediium | Accent and task areas |
| 36º-45º | Medium-wide | Balanced residential lighting |
| 45º-60º | Wide | General room illumination |
| 60º-90º | Very wide | Broad coverage |
| 90º + | Extremely wide | Large-area illumination |
These ranges should be treated as practical guidelines. The actual light distribution can vary between fixtures.
Beam Angle for Different Rooms
The ideal beam angle changes depending on how each room is used.
- Living Room
The living room usually requires a combination of general and decorative lighting.
For general lighting:
36°–60°
For artwork:
15°–24°
For decorative areas:
24°–36°
Instead of using one beam angle throughout the room, layered lighting can create a more comfortable and attractive environment.
- Bedroom
Bedrooms generally need comfortable illumination rather than intense spotlighting.
Recommended starting range:
36°–60° for general lighting
For:
- Dressing areas
- Reading corners
- Decorative walls
A 24°–36° beam can be considered.
Avoid positioning very concentrated lights where they create uncomfortable glare directly into the eyes.
- Kitchen
Kitchen lighting needs to support everyday activities such as cooking, cutting, and cleaning.
- General ceiling lighting:
36°–60°
- Countertop/task lighting:
24°–36°
- Kitchen island:
24°–36°
The most important objective is to make the working surface sufficiently visible while avoiding strong shadows.
- Dining Room
Dining areas often benefit from focused illumination around the dining table.
- Suitable range:
24°–36°
A focused beam can visually define the dining zone while maintaining a comfortable atmosphere. If a pendant light is being used, its diffuser and overall fixture design should also be considered.
- Bathroom
Bathrooms need practical and evenly distributed lighting.
- General lighting:
36°–60°
- Mirror area:
Use a dedicated mirror or vertical lighting wherever possible. The beam angle should not be considered separately from safety, glare control, and the fixture's suitability for a bathroom environment.
- Corridor
Corridors are generally narrow and elongated.
- General corridor lighting:
36°–60°
For artwork, wall décor, or architectural details:
- 24°–36°
A wider beam can help prevent excessive dark areas between fixtures.
- False Ceiling Lighting
False ceilings commonly use recessed spotlights and downlights. The correct beam angle depends on the purpose.
- General illumination
36°–60°
- Accent lighting
15°–24°
- Decorative lighting
24°–36°
One common mistake is installing too many narrow-beam spotlights simply because they look attractive in a false ceiling. This can result in bright spots and dark areas. A better approach is to plan the beam angle, fixture spacing, and lighting purpose together.
Beam Angle for Feature Walls
Feature walls can be illuminated using focused or wider beams depending on the wall's size.
- Small feature
15°–24°
- Medium feature wall
24°–36°
- Large wall
36°–60° or wider
The distance between the fixture and the wall is also important. A very narrow beam placed too close to a large wall may illuminate only a small section.
Beam Angle for Artwork
Artwork generally needs controlled illumination.
- Small artwork:
15°–24°
- Medium artwork:
24°–36°
- Large artwork:
36° or wider
The objective should be to illuminate the artwork properly without creating distracting reflections or excessive glare.
Beam Angle for Outdoor Lighting
Outdoor lighting requires consideration of mounting height, distance, and the size of the area being illuminated.
- Narrow beam
Useful for:
- Trees
- Columns
- Sculptures
- Architectural details
- Medium beam
Useful for:
- Building façades
- Landscape elements
- Medium-sized features
- Wide beam
Useful for:
- Large walls
- Open areas
- General outdoor illumination
Beam Angle and Ceiling Height
Ceiling height has a direct influence on how the beam spreads.
Consider two identical lights:
- Light installed at 2.5 meters
The illuminated area will be relatively smaller.
- Light installed at 4 meters
The same beam will spread across a larger area before reaching the floor. Therefore, choosing a beam angle without considering ceiling height can result in poor lighting distribution.
General principle
Low ceiling + wide beam
→ broader coverage
High ceiling + suitable narrow/medium beam
→ better concentration where required. However, beam angle should always be considered together with lumen output and fixture spacing.
Beam Angle and Light Spacing
Beam angle is also important when deciding how many lights are required.
If lights are positioned too far apart:
- Dark patches may appear.
- Lighting may look uneven.
- Some areas may receive insufficient illumination.
If lights are positioned too close together:
- Excessive brightness can occur.
- The ceiling can look overcrowded.
- Energy use may increase unnecessarily.
The goal is to achieve an appropriate balance between beam spread, light output, and fixture spacing.
Beam Angle vs. Lumens
These two specifications have different meanings.
- Lumens
Lumens indicate the total visible light output from a fixture.
- Beam angle
Beam angle indicates how that light is distributed.
Beam Angle vs. Wattage
Wattage indicates electrical power consumption.
It does not directly indicate:
- Beam angle
- Total light output
- Light distribution
- Color quality
Two lights with similar wattage can produce different lighting results. When comparing lights, consider: Wattage + Lumens + Beam Angle + Color Temperature + CRI + Fixture Design
Beam Angle vs. Color Temperature
Beam angle and color temperature control different aspects of lighting.
- Beam angle
Determines where the light spreads.
- Color temperature
Determines how warm or cool the light appears.
Beam Angle vs. CRI
CRI, or Color Rendering Index, relates to how naturally colors appear under a light source. Beam angle determines the spread of light, while CRI relates to color appearance.
For areas such as:
- Artwork
- Interior décor
- Clothing displays
- Food displays
- Retail spaces
Good color rendering can be particularly useful.
Narrow Beam vs. Wide Beam
- Narrow Beam
Advantages
- Strong focus
- Dramatic appearance
- Highlights specific objects
- Useful for accent lighting
Limitations
- Smaller coverage
- Can create strong shadows
- May produce uneven lighting if poorly spaced
- Wide Beam
Advantages
- Larger coverage
- Better for general illumination
- Can create a more uniform appearance
- Useful for larger areas
Limitations
- Less focused
- Can reduce the impact of accent lighting
- May not be suitable for highlighting small objects
How to Choose the Right Beam Angle
Follow these steps before purchasing a light.
Step 1: Identify the purpose.
Decide whether you need:
- General lighting
- Task lighting
- Accent lighting
- Decorative lighting
Step 2: Measure ceiling height
The mounting distance affects the size of the illuminated area.
Step 3: Identify the target.
Determine whether you are illuminating:
- A complete room
- A table
- A kitchen counter
- Artwork
- A feature wall
- A display
- A passage
Step 4: Check the required coverage.
Estimate how much area the light needs to cover.
Step 5: Check lumen output
Make sure the fixture provides sufficient light for the application.
Step 6: Consider glare.
Avoid positioning high-intensity lights where they create uncomfortable brightness.
Step 7: Plan fixture spacing.
Multiple lights should be planned as a complete lighting layout.
Step 8: Consider color temperature and CRI.
These specifications influence the overall appearance and color quality of the space.
Quick Guide: Which Beam Angle Should You Choose?
| Lighting Requirement | Suitable Stating Range |
| Small artwork | 15º-24º |
| Decorative object | 15º-24º |
| Features display | 24-36º |
| Dinning area | 24º-36º |
| Kitchen counter | 24º-36º |
| Living room | 36º-60º |
| Bedroom | 36º-60º |
| Corridor | 36º-60º |
| General room lighting | 36º-60º |
| Large-area lighting | 60º-90º + |
Common Beam Angle Mistakes
Choosing only by wattage
Wattage alone does not tell you how the light will spread.
Using narrow beams everywhere
This can produce bright spots and dark areas.
Using wide beams for small objects
A wide beam can reduce the visual focus of an accent.
Ignoring ceiling height
The same beam angle can behave differently at different mounting distances.
Ignoring light spacing
Even a suitable beam angle can produce uneven illumination if fixtures are poorly positioned.
Ignoring glare
A good lighting design should consider visual comfort as well as brightness.
Selecting lights individually
It is better to plan the entire room's lighting layout instead of choosing every fixture separately.
Conclusion
Understanding beam angle makes it easier to choose lighting that suits the purpose of each space. A 15°–24° beam is generally useful for focused accent lighting, while 24°–36° can work well for task and decorative areas. 36°–60° provides broader coverage for many residential applications, while 90° and wider beams can be considered for extensive areas. However, beam angle should never be considered alone. The final lighting choice should also take into account lumens, wattage, ceiling height, fixture spacing, color temperature, CRI, mounting position, and glare.
Frequently Asked Questions
1. What does beam angle mean in lighting?
Beam angle describes the angle through which the main light from a fixture spreads. A narrow angle creates concentrated illumination, while a wide angle covers a larger area.
2. Is a smaller beam angle better?
Not necessarily. A smaller beam angle is useful for focused lighting, while a wider beam is better for broader illumination.
3. What is the best beam angle for a living room?
For general living-room illumination, 36°–60° can be a useful starting range. Narrower beams can be added for artwork and decorative features.
4. What beam angle is suitable for a bedroom?
A 36°–60° beam can be considered for general bedroom lighting. Smaller beam angles can be used for reading, dressing, or decorative areas.
5. What beam angle is best for a kitchen?
A combination of 36°–60° for general lighting and 24°–36° for task areas can be considered.
6. What is a 15° beam angle used for?
A 15° beam is generally used for highly focused accent lighting, such as artwork, sculptures, and small decorative objects.
7. What is a 24° beam angle used for?
A 24° beam is useful for focused accent lighting, feature walls, displays, and decorative elements.
8. What is a 36° beam angle used for?
A 36° beam offers a balance between focus and coverage and can be useful for residential and commercial interior lighting.
9. What is a 60° beam angle used for?
A 60° beam provides wider illumination and can be suitable for living rooms, bedrooms, corridors, and general room lighting.
10. Does beam angle affect brightness?
Yes. With similar light output, a narrower beam concentrates light into a smaller area, which can make the center of the beam appear more intense.